readme.md
found in that repo should be enough to get going if you’re not new to projects like this, whereas the text below has a bit more detail if you need it.
Github Repository for bitwarden_gcloud
Update May 2021 I implemented a backup solution, check out Configure Bitwarden Backups for details.
Update July 2020 I added a new script and section for rebooting the host vm when updates have been made to the OS, ensuring that the host system stays patched and secure against n-day vulnerabilities.
Update June 2020 I added fail2ban
to block brute-force attacks on the webvault and country-wide blocking to avoid egress charges to China and Australia, or to block other countries that you might want. I added countryblock
to block entire countries, and I also added a watchtower
container as suggested by this comment, thanks ldw.
Update May 2020 Originally I used a home-grown dynamic dns script for Cloudflare, but it won’t be as well supported as ddclient, so I swapped out my script for linuxserver’s ddclient container. My original Cloudflare DDNS script can be found here.
I’ve been meaning to self-host Bitwarden for some time. If you don’t know about Bitwarden, it’s a password manager that’s open source and allows you to host it yourself! Now my encrypted password data is even more in my control. While I have a home server, I want to limit its exposure to the public Internet. Any service you expose to the Internet can become a pivot point to the rest of your internal network.
I saw that Google Cloud offers an ‘always free’ tier of their Compute Engine. Will one shared core and 614 MB of memory be enough for Bitwarden? According to the system requirements Bitwarden requires 2GB of RAM, but reports in its Github issue tracker say that even that is not enough. I went through the trouble of trying it out anyway and it failed spectacularly, the install script couldn’t even finish. There is, however, a lightweight alternative: Bitwarden RS. It’s written in Rust and an ideal candidate for a micro instance.
Before you start, ensure you have the following:
ddclient
for dynamic dns support; a list of supported DNS services can be seen here Note: not all DDNS providers are supported by LetsEncrypt, YMMVAt the time or writing this, Google offers one free Google Compute Engine f1-micro instance with the following specifications:
* Region:
* Oregon: us-west1
* Iowa: us-central1
* South Carolina: us-east1
* 30 GB-months HDD
* 5 GB-month snapshot storage in the following regions:
* Oregon: us-west1
* Iowa: us-central1
* South Carolina: us-east1
* Taiwan: asia-east1
* Belgium: europe-west1
* 1 GB network egress from North America to all region destinations (excluding China and Australia) per month
To get started, go to Google Compute Engine (after doing all the necessary setup of creating a project, and providing billing info if necessary - don’t worry, this will cost exactly $0.00 each month if done correctly) and open a Cloud Shell. You can create the instance manually, but the Cloud Shell makes everything easier. In the Cloud Shell (a small icon in the upper right corner of your Google Cloud console), the following command will build the properly spec’d machine:
$ gcloud compute instances create bitwarden \
--machine-type f1-micro \
--zone us-central1-a \
--image-project cos-cloud \
--image-family cos-stable \
--boot-disk-size=30GB \
--tags http-server,https-server \
--scopes compute-rw
You can change the zone if you’d like, however only some have the f1-micro machine-type available. The tags open up the firewall HTTP and HTTPS (HTTP is required later). I’m using the maximum free HDD because apparently I get higher IOPS and it will allow me to maximize the amount of encrypted attachments I can have on this.
I am using the stable Container Optimized OS (COS) for several reasons, primarily:
CoreOS was also a contender but it used more memory at idle in my limited testing.
Important: Close the Cloud Shell and continue into into the vm instance SSH shell by selecting it in the Google Cloud Console and clicking the SSH
button.
Enter a SSH shell on the new vm instance by clicking the instance’s SSH
button. Once you’re in the new shell, clone this repo in your home directory:
$ cd
$ git clone https://github.com/dadatuputi/bitwarden_gcloud.git
$ cd bitwarden_gcloud
Before you can start everything up, you need to set up the docker-compose alias by running the utilities/install-alias.sh
script (you can read more about why this is necessary here). The script just writes the alias to ~/.bash_alias
and includes it in ~/.bashrc
:
$ sh utilities/install-alias.sh
$ source ~/.bashrc
$ docker-compose --version
docker-compose version 1.25.5, build 8a1c60f
I provide .env.template
which should be copied to .env
and filled out. Most of your configuration is done in .env
and is self-documented. This file is a collection of environmental variables that are read by docker-compose
and passed into their respective containers.
There is rudimentary support for backups provided by default and configured for the most part in the .env
file. Look for the Bitwarden Backup Options
section.
When enabled, backup will run on a regular interval (daily at midnight by default) and keep 30 days (default) of backups in the bitwarden/backups
directory. The script will back up the following resources (based on this documentation):
db.sqlite3
- encrypted databasebitwarden/attachments
- attachments directorybitwarden/sends
- sends directoryconfig.json
- file with configuration settings (if it exists)rsa_key*
- keys for logged in usersThere are three backup methods:
local
- backup to the local directory only on the designated interval. You may want to use this if you have your own backup method in mind to synchronize bitwarden/backups
email
- email the latest backuprclone
- synchronize the entire backup directory to a cloud storage serviceThis is the simplest method and will just maintain a directory of backups and optionally email you when the job is complete.
This backup method uses the SMTP settings provided to Bitwarden, so ensure that those variables are populated with correct values. The email default values provide a daily gzipped backup to your e-mail. This backs up the attachments
and sends
folders, so it could get quite large and may not be suitable for users who use attachments and sends.
This method is more powerful and a better option for users with large backups. To configure rclone, either provide a working configuration file at bitwarden/rclone.conf
or create one using the following command from your gcloud shell while bitwarden is running:
sudo docker exec -it bitwarden ash -c 'rclone config --config $BACKUP_RCLONE_CONF'
Follow the instructions at Rclone Remote Setup. Rclone will guide you through the configuration steps. You will likely need to download rclone on a host with a gui, however rclone does not require installation so this step is easier than it sounds.
Your backup should run at the next cron job, however you may test it from the Google cloud shell with the following command, replacing <local|email|rclone>
with the backup method you would like to test:
sudo docker exec -it bitwarden ash /backup.sh <local|email|rclone>
Look at the log files if you run into issues, and ensure that the appropriate environmental variables are set correctly
fail2ban
(optional)fail2ban
stops brute-force attempts at your vault. It will ban an ip address for a length of time (6 hours by default in this configuration) after a number of attempts (5). You may change these options in the file fail2ban/jail.d/jail.local
:
bantime = 6h <- how long to enforce the ip ban
maxretry = 5 <- number of times to retry until a ban occurs
This will work out of the box - no fail2ban
configuration is needed unless you want e-mail alerts of bans. To enable this, enter the SMTP settings in .env
, and follow the instructions in fail2ban/jail.d/jail.local
by uncommenting and entering destemail
and sender
and uncommenting the action_mwl
action in the bitwarden
and bitwarden-admin
jails in the same file.
The countryblock
container will block ip addresses from countries specified in .env
under COUNTRIES
. China, Hong Kong, and Australia (CN, HK, AU) are blocked by default because Google Cloud will charge egress to those countries under the free tier. You may add any country you like to that list, or clear it out entirely if you don’t want to block those countries. Be aware, however, you’ll probably be charged for any traffic to those countries, even from bots or crawlers.
This country-wide blocklist will be updated daily at midnight, but you can change the COUNTRYBLOCK_SCHEDULE
variable in .env
to suit your needs.
These block-lists are pulled from www.ipdeny.com on each update.
Container-Optimized OS will automatically update itself, but the update will only be applied after a reboot. In order to ensure that you are using the most current operating system software, you can set a boot script that waits until an update has been applied to schedule a reboot.
Before you start, ensure you have compute-rw
scope for your bitwarden compute vm. If you used the gcloud
command above, it includes that scope. If not, go to your Google Cloud console and edit the “Cloud API access scopes” to have “Compute Engine” show “Read Write”. You need to shut down your compute vm in order to change this.
Before adding the startup script to Google metadata, modify the script to set your local timezone and the time to schedule reboots: set the TZ=
and TIME=
variables in utilities/reboot-on-update.sh
. By default the script will schedule reboots for 06:00 UTC.
From within your compute vm console, type the command toolbox
. This command will download the latest toolbox
container if necessary and then drop you into a shell that has the gcloud
tool you need to use. Whenever you’re in toolbox
, typing the exit
command will return you to your compute vm.
From within toolbox
, find the utilities
folder within bitwarden_gcloud
. toolbox
mounts the host filesystem under /media/root
, so go there to find the folder. It will likely be in /media/root/home/<google account name>/bitwarden_gcloud/utilities
- cd
to that folder.
Next, use gcloud
to add the reboot-on-update.sh
script to your vm’s boot script metadata with the add-metadata
command:
gcloud compute instances add-metadata <instance> --metadata-from-file startup-script=reboot-on-update.sh
If you have forgotten your instance name, look at the Google Cloud Compute console or find it with the toolbox
/gcloud
command # gcloud compute instances list
You can confirm that your startup script has been added in your instance details under “Custom metadata” on the Compute Engine Console.
Next, restart your vm with the command $ sudo reboot
. Once your vm has rebooted, you can confirm that the startup script was run with the command:
$ sudo journalctl -u google-startup-scripts.service
You should see something like these lines in the log:
-- Reboot --
Jul 16 18:44:10 bitwarden systemd[1]: Starting Google Compute Engine Startup Scripts...
Jul 16 18:44:10 bitwarden startup-script[388]: INFO Starting startup scripts.
Jul 16 18:44:10 bitwarden startup-script[388]: INFO Found startup-script in metadata.
Now the script will wait until a reboot is pending and then schedule a reboot for the time configured in the script.
If necessary you can run the startup script manually with the command $ sudo google_metadata_script_runner --script-type startup --debug
, and get the status of automatic updates with the command $ sudo update_engine_client --status
.
docker-compose
Use docker-compose
to get the containers started:
$ docker-compose up
Normally, you’d include a -d
, as in $ docker-compose up -d
, however the first time is nice to see the initial startup. You should see the caddy
service attempt to use ACME to auto-negotiate a Let’s Encrypt SSL cert, for example. It will fail because you don’t have DNS properly set up yet, which is fine. It will keep trying.
If you need to open another SSH session to continue, do that from the Google Cloud Console.
DDNS is optional in the sense that you can manually set your DNS record to your ephemeral address, but I don’t know how often Google gives you a new address. Furthermore, LetsEncrypt has a problem with some DDNS providers, so having a real DNS provider like Cloudflare, etc, may be necessary.
Google charges for static IPs, but their ephemeral IPs are free.
Before you can get an SSL cert issued by Caddy/LetsEncrypt, you need a DNS record that points to your Google Cloud vm. You’ll notice in your logs that Caddy/LetsEncrypt will keep trying with the ACME protocol.
Dynamic DNS is supported using ddclient through the ddclient docker container. The ddclient container provides a configuration file at ddns/ddclient.conf
that you must edit to work with your particular DNS provider. Their GitHub repo here contains documentation on configuring ddclient
and the ddclient.conf
file.
Note: ddclient.conf
is placed in the ddns/
directory by the ddns container when it is run the first time, and any changes made to this configuration file will automatically be read in by the ddns container, no need to stop and start the container; you will see this shown in the logs.
Since I use Cloudflare, I can provide more detail about this step. For other DNS providers, you’re on your own but the documentation for ddclient
is pretty helpful.
Edit ddns/ddclient.conf
and add the following lines:
use=web, web=checkip.dyndns.org/, web-skip='IP Address' # found after IP Address
protocol=cloudflare
zone=<your cloudflare site / base URL / e.g. example.com>
ttl=0
login=<your e-mail>
password=<GLOBAL API KEY FOUND UNDER [MY PROFILE]-> [API TOKENS] IN CLOUDFLARE>
<your bitwarden site subdomain / e.g. bw.example.com>
Newer commits to ddclient
support API tokens which are a better choice than a global key, but those commits haven’t made their way into a full ddclient
release, so they haven’t been pulled into the container.
If everything is running properly (the logs will tell you when it isn’t), you can use your browser to visit the address that points to your new Google Cloud Bitwarden vm and start using Bitwarden! Depending on which bootstrapping method you chose in .env
(whether you use the /admin
page or have open sign-up enabled), you can create your new account and get going!
If you run into issues, such as containers not starting, the following commands will be helpful:
docker ps
- this will show what containers are running, or if one of them has faileddocker-compose logs <container name>
- this will show the recent logs for the container name (or all containerse if you omit the name) and is very useful in troubleshootingYou should now have a free self-hosted instance of Bitwarden that survives server reboots with an OS that gets timely security patches automatically.
There’s plenty of tweaking and optimization possible, feel free to make this yours. There were many resources that I used to build this guide, many of them listed below. Feel free to comment with any optimizations or issues that you run across.
$ sudo nano /etc/postfix/sasl_passwd
Add your smtp server, email address, and password (ideally an application-specific password generated in your Zoho control panel):
smtp.zoho.com email@address.com:password
Now hash your postfix password and set proper permissions on the original:
$ sudo postmap hash:/etc/postfix/sasl_passwd
$ sudo chmod 600 /etc/postfix/sasl_passwd
Now, edit /etc/postfix/main.cf
and add the following lines:
relayhost = smtp.zoho.com:465
smtp_use_tls = yes
smtp_sasl_auth_enable = yes
smtp_sasl_security_options =
smtp_tls_wrappermode = yes
smtp_tls_security_level = encrypt
smtp_sasl_password_maps = hash:/etc/postfix/sasl_passwd
smtp_tls_CAfile = /etc/ssl/certs/Entrust_Root_Certification_Authority.pem
smtp_tls_session_cache_database = btree:/var/lib/postfix/smtp_tls_session_cache
smtp_tls_session_cache_timeout = 3600s
sender_canonical_classes = envelope_sender, header_sender
sender_canonical_maps = regexp:/etc/postfix/sender_canonical
smtp_header_checks = regexp:/etc/postfix/smtp_header_checks
Create /etc/postfix/sender_canonical
and put in your Zoho email address:
/.+/ email@address.com
Create /etc/postfix/smtp_header_checks
and put in your Zoho email address
/From:.*/ REPLACE From: email@address.com
Optionally, if you want to customize the name that the email is coming from, try:
/From:.*/ REPLACE From: Dumbledore <email@address.com>
Update 1 Jan 2021 - After rebuilding my Proxmox server with the latest version (6.3), I couldn’t proceed to the next step until I repaired folder permissions, deleted a stuck master.lock
file, installed libsasl2-modules
, and restarted the postfix service - for other distros, ymmv:
$ sudo postfix set-permissions
$ sudo rm /var/lib/postfix/master.lock
$ sudo apt install libsasl2-modules
$ sudo systemctl restart postfix
Finally, reload postfix and send a test message:
$ sudo postfix reload
$ echo "test message" | mail -s "test subject" another@email.com
Voila! If you have issues, check your logs in /var/log/syslog
and /var/log/mail.info
Serverfault: Forcing the from address when postfix relays over smtp
]]>Looking around at Python data science packages, I first started with Spyder. It was capable, but it was a bit unpolished, so I kept looking and found Jupyter and the new Jupyter Lab project, which, while in active development, looks like it might be a good fit for my project.
In this guide I will guide you through creating a user-space Anaconda environment, install Jupyter Lab, and create a systemd
service that will automatically run Jupyter Lab at startup. I did everything in an Ubuntu 17.04 Server (headless) virtual machine running in VMWare Workstation 14 on Windows 10, although this should work for any Linux distribution with systemd
.
Pyenv
is a fantastic script that will manage your python environment so you don’t have to worry about changing the system default python environment.
You need a system with certain build packages installed already - so if you don’t have root access, talk to your sysadmin to get these installed. Chances are they already are.
$ sudo apt install -y make build-essential libssl-dev zlib1g-dev libbz2-dev \
libreadline-dev libsqlite3-dev wget curl llvm libncurses5-dev libncursesw5-dev \
xz-utils tk-dev
With these installed, you’re ready to install pyenv
.
The simplest way to install pyenv is through pyenv installer, with the following commands:
$ curl -L https://raw.githubusercontent.com/pyenv/pyenv-installer/master/bin/pyenv-installer | bash
The installer will spit out a blob of code it thinks you should put in your ~/.bash_profile file, something like this:
export PATH="~/.pyenv/bin:$PATH"
eval "$(pyenv init -)"
eval "$(pyenv virtualenv-init -)"
Update pyenv with this command:
$ pyenv update
If you get a command not found
error, you may need to reload your ~/.bash_profile so your current shell session knows where the pyenv command is:
$ source ~/.bash_profile
You now have a working pyenv
environment.
Pyenv is great because you can install many versions of Python, or Python distributions such as Anaconda or Miniconda.
To see a list of the available distributions, type
$ pyenv install -l
Jupyter is part of Anaconda, so we’ll install the current (as of this guide) release of Anaconda:
$ pyenv install anaconda3-5.0.1
This step will take some time, since Anaconda is a hefty distribution.
Once Anaconda is installed, activate it with the activate
subcommand. Pyenv supports tab completion which makes many commands easier:
$ pyenv activate ana<tab key>
$ pyenv activate anaconda3-5.0.1
(anaconda3-5.0.1) $
You may also deactivate the current pyenv
with the command
(anaconda3-5.0.1) $ pyenv deactivate
$
We need Node.js for the Jupyter Lab plugins, and we can install that to our user profile as well with Node Version Manager (NVM).
To install nvm
, use the following command:
curl -o- https://raw.githubusercontent.com/creationix/nvm/v0.33.8/install.sh | bash
nvm
automatically adds the proper environmental variables to your ~/.bashrc file, but let’s move it to your ~/.bash_profile. Edit ~/.bashrc with your editor of choice, and look for the following lines (close to the end):
export NVM_DIR="$HOME/.nvm"
[ -s "$NVM_DIR/nvm.sh" ] && \. "$NVM_DIR/nvm.sh" # This loads nvm
[ -s "$NVM_DIR/bash_completion" ] && \. "$NVM_DIR/bash_completion" # This loads nvm bash_completion
Cut them from ~/.bashrc and paste them into ~/.bash_profile
You won’t have access to nvm
until you either log out or reload ~/.bash_profle with
$ source ~/.bash_profile
Now that we have nvm
installed, let’s install node.js
. To see a list of available node.js
distributions available, type
$ nvm ls-remote
To install the most current LTS release of node.js
, type
$ nvm install --lts
Now we have an environment ready for Jupyter Lab.
Installing Jupyter Lab is as simple as a single conda
command from the Anaconda environment:
$ pyenv activate anaconda3-5.0.1
(anaconda3-5.0.1) $ conda install -c conda-forge jupyterlab
The script will ask you to upgrade (or downgrade) certain modules to accomodate jupyterlab
.
Once it is installed, test that it works with the command
(anaconda3-5.0.1) $ jupyter lab
...<logs>...
Copy/paste this URL into your browser when you connect for the first time,
to login with a token:
http://localhost:8888/?token=1ba6d4c77e6b6028365e2467f5134ce128f5d3a649aa2a26
If your command was successful, you’ll see output like that above, with a link and token. If you are running jupyterlab
on a different machine, you won’t be able to access it since it is not listening to external requests (only localhost
by default).
Configuring jupyterlab
isn’t very straightforward since the documentation is pretty sparse. Much of the documentation for jupyter notebook
applies to jupyterlab
, however.
The --ip
argument specifies which IP address to listen for connection requests on, so determine your ip address with ip address
command
--ip=<your ip address>
If you want to enable SSL, follow these steps as well, pulled from the Jupyter Notebook docs.
Make a directory to store your keys and self-signed cert. I created mine in ~/.jupyter
, which is the default jupyterlab
config directory (use the command (anaconda3-5.0.1) $ jupyter --config-dir
to see yours). Once you have a directory for your keys and cert, use the following command to generate them:
(anaconda3-5.0.1) $ mkdir -p ~/.jupyter/keys
(anaconda3-5.0.1) $ cd ~/.jupyter/keys
(anaconda3-5.0.1) $ openssl req -x509 -nodes -days 365 -newkey rsa:2048 -keyout mykey.key -out mycert.pem
Now, we use the command line parameters --keyfile
and --certfile
to use when setting up our jupyterlab
server:
--keyfile=~/.jupyter/keys/mykey.key
--certfile=~/.jupyter/keys/mycert.pem
Now we can test these parameters to make sure they work, and we can access Jupyter Lab from an external browser:
(anaconda3-5.0.1) $ jupyter lab --ip=<your ip address> --keyfile=~/.jupyter/keys/mykey.key --certfile=~/.jupyter/keys/mycert.pem
...<logs>...
Copy/paste this URL into your browser when you connect for the first time,
to login with a token:
https://<your ip address>:8888/?token=35b5492a621e16fdcc97c0a9d7e3c4241416737ca8e7f0fd
You should now be able to access that URL and access Jupyter Lab.
You may have to click through self-signed cert warnings in your browser. The Jupyter Notebook docs have instructions on how to get trusted SSL certs as well.
There are certain advantages to creating your environment using pyenv
and nvm
, however running services as a user is a little tricky.
The first step is to create and modify a Jupyter Notebook config file. I assume that since Jupyter Lab is beta, it will eventually have its own config file, but for now it uses the Notebook config.
jupyter_notebook_config.py
Initialize a Jupyter Notebook config file with the command
(anaconda3-5.0.1) $ jupyter lab --generate-config
You now have a file called jupyter_notebook_config.py
in your jupyter
config directory (most likely ~/.jupyter
). Edit that file, and let’s place some of your command line arguments there instead. Modify the following lines
#c.NotebookApp.keyfile = ''
#c.NotebookApp.certfile = ''
to
c.NotebookApp.keyfile = '/home/<YOUR USER>/.jupyter/keys/mykey.key'
c.NotebookApp.certfile = '/home/<YOUR USER>/.jupyter/keys/mycert.pem'
You must use absolute paths here, since a home path with ~
doesn’t work in our script below.
You may specify your ip address in this config file (by uncommenting and modifying #c.NotebookApp.ip = 'localhost'
), however if your environment has dynamic ip addresses, you can dynamically determine your ip address in the startup script below.
If you want to log in using a password, use the following command to generate a password in your config file:
(anaconda3-5.0.1) $ jupyter notebook password
Enter password: ****
Verify password: ****
[NotebookPasswordApp] Wrote hashed password to ~/.jupyter/jupyter_notebook_config.json
You will now be prompted for a password instead of required to use the generated token.
jupyterlab.sh
Create a file called jupyterlab.sh
in your home directory (or anywhere else), and open it up in your favorite text editor.
#!/bin/bash
eval "$(pyenv init -)"
pyenv activate anaconda3-5.0.1
cd <your jupyterlab working directory>
IP=`ip -4 route get 8.8.8.8 | awk {'print $7'} | tr -d '\n'`
jupyter lab --no-browser --ip=$IP
Modify the 4th line above (cd
) to change directory to your data working directory.
Line 5 will start jupyterlab
on the current ip address that is routable to the internet. You can change this or remove this and statically set the ip addres as well.
Save the file and chmod
it to allow execution:
(anaconda3-5.0.1) $ chmod +x jupyterlab.sh
You may test this script by running the script (in or out of the anaconda environment):
$ ./jupyterlab.sh
Now that we have a working jupyterlab
startup script, we can create a user service for it. I use systemd
for this.
First, create the directory systemd
looks in for user-defined services:
$ mkdir -p ~/.config/systemd/user/
Edit the file ~/.config/systemd/user/jupyterlab.service
to look like this:
[Unit]
Description=Service to run JupyterLab in user space
[Service]
ExecStart=/bin/bash -c "source ~/.bash_profile; eval ~/jupyterlab.sh"
[Install]
WantedBy=default.target
Now enable the jupyterlab.service
you just created with
$ systemctl --user enable jupyterlab.service
If you get a message like Failed to connect to bus: No such file or directory
, it means the dbus
service isn’t running for your user. Restarting, or starting a new shell should do the trick. I had this issue when logging in as a new user using the su - <user name>
command.
Start the service with the start
command, and view the status of the service with the status
command:
$ systemctl --user start jupyterlab
$ systemctl --user status jupyterlab
If you don’t see any log messages when using the status
command, you may need to edit /etc/systemd/journald.conf
as root and set the value Storage=persistent
, per this issue
The output from status
will tell you the address to visit and help you with troubleshooting steps as well. If you still are using tokens (instead of a password, as described above), the token will be displayed in this log.
That’s it! You now have a service that automatically starts that will give you remote access to Jupyter Lab.
To enable ipywidgets
widget support with jupyterlab
, run the following command from your anaconda
environment:
(anaconda3-5.0.1) $ conda install -c conda-forge ipywidgets
(anaconda3-5.0.1) $ jupyter labextension install @jupyter-widgets/jupyterlab-manager
]]>
Update May 2020: This method apparently doesn’t work on my Microsoft account profile. I had to make my account a local account, after which this method continued working.
I’m a bit of a night owl. Lately I’ve found myself working late (or not working, but just staying up). When the family is asleep and the sun is down, it’s difficult to tell how much time has passed. I’d like Windows to firmly remind me to go to bed when midnight rolls around.
Windows 10 has parental controls that you may use to enforce time limits or logon hours, but the targeted account must be a designated child account.
It is possible, however, to enforce logon hour limits and force a user to log off when they have crossed a time limit.
Open a privileged command prompt, and use the following command:
net user <username> /time:<day>,<time>
<day>
: This is a day or day span. The days are Su
, M
, T
, W
, Th
, F
, and Sa
. A day span would be two days separated by a dash, like Su-Sa
.
<time>
: This is a time span of the time the user should be allowed to log in, such as 8am-4pm
.
You may also have multiple spans of time separated by a semicolon and surrounded by quotes, such as:
net user bradford /time:"M-F,6am-8am;M-F,4pm-10pm"
From Superuser:
To lock user session after logon hours expire, run the
Local Group Policy Editor
and set action to take when logon hours expire:
- Press Win+R, then type
gpedit.msc
.- Under
User Configuration
->Administrative Templates
->Windows Components
->Windows Logon Options
, click onSet Action to take when logon hours expire
.- Choose
Enabled
, then set the action toLock
orLogoff
, depending on your needs.
That’s it! Your account should now lock you out when you’re outside your hours. Go to bed.
The details in this article are pulled directly from the project README
. If you’re interested in the project, go there to get the latest information.
A 15:52 Video Demonstration is available on YouTube as well, and covers much of the content below:
Privledge is a proof of concept private permissioned distributed ledger used for public key management written in Python 3.5 and released under the MIT License.
Privledge uses Python 3.5 so be sure to use the appropriate command for Python 3.5 pip
I recommend using a virtual environment with virtualenvwrapper and mkproject (documentation/installation):
$ mkproject -p python3.5 privledge
To enter and leave your virtual environment, use the commands workon
and deactivate
respectively:
$ workon privledge
(privledge) $ deactivate
$
(privledge) $ git clone git@github.com:elBradford/privledge.git .
(privledge) $ pip install -e .
(privledge) $ pls
Welcome to Privledge Shell...
> help
-e
is an optional pip argument that allows you to modify the code and have the changes immediately applied to the installed script - no need to reinstall to see changes you made.
This project consists of two main components:
The daemon maintains the state, including the ledger, all known peers, and any communication threads needed to pass messages to peers.
The shell is your interface to the daemon. In the shell you can interact with the ledger, search for more peers, and more.
We enter the Privledge shell by the command pls
after a successful installation:
(privledge) $ pls
Welcome to Privledge Shell...
>
Typing help
within the shell will show all the available commands:
> help
Documented commands (type help <topic>):
========================================
block discover help join leave quit status
debug exit init key ledger shell
Typing help <command name>
will give specific help for that command:
> help key
Manage your local private key
Arguments:
gen: Generate a new RSA key
pub (default): Prints the public key
priv: Prints the private key
>
We can initialize a ledger with the init
command, followed by one of the following:
gen
, which will generate a public/private RSA key pair. If you also provide a path, it will save the keys to the local filesystem.> init gen
Public Key Hash: 08022ade6757177ad4e0395118cf638b0eabf562
Added key (08022ade6757177ad4e0395118cf638b0eabf562) as a new Root of Trust
root>
If we would like to join an existing ledger, we use the discover
command to search our local subnet for available ledgers, or discover <ip>
to query a specific ip address:
> discover
Found 2 available ledgers
1 | 192.168.159.131: (1 members) 19991b9288c93cb41a6e042d040383763912fd03e0f6b5c717b42965c0b99a7e
2 | 192.168.159.130: (1 members) 812858c1fd8fcb38cd8fa3f8c1040dae06714a78822818c3b7a48eb8b66ced16
>
If we see a ledger we would like to join, we use the join
command, followed by the number of the item provided by the list
command:
> join 1
Joined ledger 19991b9288c93cb41a6e042d040383763912fd03e0f6b5c717b42965c0b99a7e
>
To see the status of our ledger, we can use the status
command:
> status
You are a member of ledger 19991b9288c93cb41a6e042d040383763912fd03e0f6b5c717b42965c0b99a7e and connected to 1 peers.
>
status detail
gives us more details about our ledger; the Root of Trust:
> status detail
You are a member of ledger 19991b9288c93cb41a6e042d040383763912fd03e0f6b5c717b42965c0b99a7e and connected to 1 peers.
Root of Trust:
Type: key (root)
Block Hash: d1a57995ecf02bed7c08b546702424ee2fd67a7654c48f2f2f22a7502033be81
Message: 2TuPVgMCHJy5atawrsADEzjP7MCVbyyCA89UW6Wvjp9HrAsCWKC5L4c1xVjtShQ7
Message Hash: 19991b9288c93cb41a6e042d040383763912fd03e0f6b5c717b42965c0b99a7e
Signatory Hash: 19991b9288c93cb41a6e042d040383763912fd03e0f6b5c717b42965c0b99a7e (self-signed)
Predecessor: None
>
The init
and join
commands will join us to a ledger. If we would like to leave the ledger, leave
will remove the ledger from our system and allow us to join another or generate our own:
> leave
Left ledger 19991b9288c93cb41a6e042d040383763912fd03e0f6b5c717b42965c0b99a7e
>
Only a block signed by a valid key will be accepted onto the ledger. If you are the node that initialized the ledger (with init
), your private key is already automatically used to sign any new blocks.
The block
command adds new blocks to the ledger and requires a blocktype (key|revoke|text) followed by a message. To add a new key, the command is
root> block key <base58-encoded public key>
Added new block to ledger:
Type: key
Block Hash: 1ddafda59d2a6a6be1c4796f1664244341b13fa1b8d2d8255afe316578463e59
Message: <base58-encoded public key>
Message Hash: c84e8341fd47b00911f49ae921a247a99603ca2a1f594234279a91892e16ac32
Signatory Hash: ab8c88feeccf1f108111ae777fc24be76a4b1d2348f564ea2fadabc07f91b0b3
Predecessor: 66d2e72288cc9299415aa0ee014f2accea3f63f054fbd2e1d7c87e0dfd0f9993
root>
The revoke
blocktype requires a public key and revokes it from the ledger. text
blocks simply contain arbitrary text:
root> block text hello world!
Added new block to ledger:
Type: text
Block Hash: 66d2e72288cc9299415aa0ee014f2accea3f63f054fbd2e1d7c87e0dfd0f9993
Message: hello world!
Message Hash: 7509e5bda0c762d2bac7f90d758b5b2263fa01ccbc542ab5e3df163be08e6ca9
Signatory Hash: ab8c88feeccf1f108111ae777fc24be76a4b1d2348f564ea2fadabc07f91b0b3
Predecessor: f99e2442950afc5d43a076481510ddb9a9f647baac23f3cf5b2d501b6dd51aa7
root>
If you need a quick and dirty way to generate an RSA key, key
will do it for you.
> key gen
<new public key>
>
The key gen
command generates a public-private key pair and outputs the public portion to the console base58 encoded. You can then copy that and use it to add a new key to the ledger from a node with an authorized private key.
root> block key <new public key>
Added new block to ledger:
Type: key
Block Hash: 148e395adfd8f3dfe798572eb318c2514a91f255f77636b2dd33168c691c362a
Message: <new public key>
Message Hash: de2e233f919c09137f97a113a797cc69b99e34465e5b1d2ea25da6f6bbb09649
Signatory Hash: d77bf92679bfa82207743a8790c9b266183d480b50c23d69cfd56e44ce20e0a7
Predecessor: 1ddafda59d2a6a6be1c4796f1664244341b13fa1b8d2d8255afe316578463e59
root>
With our key added, we can now write to the ledger as well:
> block text I'm a trusted node!
Added new block to ledger:
Type: text
Block Hash: 3882d9cd33bb20c4d189c4f717164e1a97ad1d7008287ce3f50616c822a82fa6
Message: I'm a trusted node!
Message Hash: 676b9a62c5d772e0d428c2c08074920da49510a94b187bf164049c8ec3daec6f
Signatory Hash: de2e233f919c09137f97a113a797cc69b99e34465e5b1d2ea25da6f6bbb09649
Predecessor: 148e395adfd8f3dfe798572eb318c2514a91f255f77636b2dd33168c691c362a
>
Displaying the ledger is done with the ledger
command
> ledger
13 Type: text
Block Hash: 3882d9cd33bb20c4d189c4f717164e1a97ad1d7008287ce3f50616c822a82fa6
Message: I'm a trusted node!
Message Hash: 676b9a62c5d772e0d428c2c08074920da49510a94b187bf164049c8ec3daec6f
Signatory Hash: de2e233f919c09137f97a113a797cc69b99e34465e5b1d2ea25da6f6bbb09649
Predecessor: 148e395adfd8f3dfe798572eb318c2514a91f255f77636b2dd33168c691c362a
12 Type: key
Block Hash: 148e395adfd8f3dfe798572eb318c2514a91f255f77636b2dd33168c691c362a
Message: 2TuPVgMCHJy5atawrsADEzjP7MCVbyyCA89UW6Wvjp9HrAUjudRyQEGBjDpD5UH7
Message Hash: de2e233f919c09137f97a113a797cc69b99e34465e5b1d2ea25da6f6bbb09649
Signatory Hash: d77bf92679bfa82207743a8790c9b266183d480b50c23d69cfd56e44ce20e0a7
Predecessor: 1ddafda59d2a6a6be1c4796f1664244341b13fa1b8d2d8255afe316578463e59
11 Type: key
Block Hash: 1ddafda59d2a6a6be1c4796f1664244341b13fa1b8d2d8255afe316578463e59
Message: 2TuPVgMCHJy5atawrsADEzjP7MCVbyyCA89UW6Wvjp9HrAibjYGr3FUsSLd5q8yu
Message Hash: c84e8341fd47b00911f49ae921a247a99603ca2a1f594234279a91892e16ac32
Signatory Hash: ab8c88feeccf1f108111ae777fc24be76a4b1d2348f564ea2fadabc07f91b0b3
Predecessor: 66d2e72288cc9299415aa0ee014f2accea3f63f054fbd2e1d7c87e0dfd0f9993
...10 hidden blocks...
r Type: key (root)
Block Hash: 6cbc660069f687426f36bb92a6a1bc8c564ca40f6aa7f81d11f7fa44730b09e2
Message: 2TuPVgMCHJy5atawrsADEzjP7MCVbyyCA89UW6Wvjp9HrBtr9a3jck5CbJcZbSq1
Message Hash: ab8c88feeccf1f108111ae777fc24be76a4b1d2348f564ea2fadabc07f91b0b3
Signatory Hash: ab8c88feeccf1f108111ae777fc24be76a4b1d2348f564ea2fadabc07f91b0b3 (self-signed)
Predecessor: None
>
You may display an arbitrary number of blocks by including a number after the command, such as
> ledger 1
13 Type: text
Block Hash: 3882d9cd33bb20c4d189c4f717164e1a97ad1d7008287ce3f50616c822a82fa6
Message: I'm a trusted node!
Message Hash: 676b9a62c5d772e0d428c2c08074920da49510a94b187bf164049c8ec3daec6f
Signatory Hash: de2e233f919c09137f97a113a797cc69b99e34465e5b1d2ea25da6f6bbb09649
Predecessor: 148e395adfd8f3dfe798572eb318c2514a91f255f77636b2dd33168c691c362a
...12 hidden blocks...
r Type: key (root)
Block Hash: 6cbc660069f687426f36bb92a6a1bc8c564ca40f6aa7f81d11f7fa44730b09e2
Message: 2TuPVgMCHJy5atawrsADEzjP7MCVbyyCA89UW6Wvjp9HrBtr9a3jck5CbJcZbSq1
Message Hash: ab8c88feeccf1f108111ae777fc24be76a4b1d2348f564ea2fadabc07f91b0b3
Signatory Hash: ab8c88feeccf1f108111ae777fc24be76a4b1d2348f564ea2fadabc07f91b0b3 (self-signed)
Predecessor: None
>
The ledger
command will always show the root of trust in addition to the specified number of blocks.
Privledge uses both TCP and UDP to communicate between peers. Once a ledger is established by the daemon, the daemon spawns a listener on port 2525 for each protocol:
The UDP Listener listens for ledger queries and responds with a hash of the root of trust public key. This is the ledger id
and serves to identify the ledger.
The UDP Listener also listens for heartbeat messages. Heartbeat messages contain a ledger id - if the heartbeat ledger id is the same as our ledger id we consider the source a peer and add them to the daemon peer list along with the current time.
In addition to keeping the peer list alive, these heartbeat messages help keep the ledger in sync. Each heartbeat contains the hash of the last block in the chain - if it matches our tail hash, we are in sync and do nothing. If it is in our ledger, the peer is out of sync and we do nothing. If it is not in our ledger we initiate a ledger sync, detailed below.
An additional thread, UDP Heartbeat, regularly loops through the list of peers and sends heartbeat messages. It also maintains the peer list by pruning away peers it hasn’t received a heartbeat from in some time.
The TCP Listener accepts sockets and spawns threads that manage different message types. TCP messages are of the following types:
join
: This message contains a block hash. If it matches the ledger id, the receiver will respond with the entire public key of the root of trustledger
: This message contains a block hash. The receiver will respond with a list of blocks up to the specified block hash. If the block hash is null, the entire ledger will be transmitted. This message type allows for synchronization between nodes.peers
: This message is used to request the list of peers from the another peer. The receiver replies with a list of its peers.As a proof of concept, this project is a work in progress. The following features are planned but have not yet been implemented:
System Integration: As a proof of concept, it should demonstrate how a system could utilize the ledger as a system access control list.
Privledge Levels: Demonstrate different uses for different privilege levels:
Now let’s talk about the state of blockchain technologies now, circa 2017. How has it changed since it was first used in 2009?
Since Bitcoin was launched in early 2009 it has grown immensely. It is now disrupting financial markets and inspiring startups to follow suit and leap into blockchain technologies.
While there have been major changes to Bitcoin since it was launched, its blockchain remains the same unbroken link of transactions from the genesis block. That chain is now more than 100GB and it’s still growing - even faster as the popularity of Bitcoin increases. This overhead will have to be addressed in the near future.
Since the Bitcoin source code is open, it’s possible to fork the code base and change it to create an ‘altcoin’. In fact, many have done this and have varying levels of support and valuation. The valuation of cryptocurrency is an interesting study and certainly keeps a lot of people busy guessing - and has made some of them very wealthy.
Image Credit: Ethereum Group
For some time blockchains were primarily proof of work cryptocurrencies. One of the first steps of a blockchain moving beyond this was Ethereum in 2015, when Ethereum launched a platform that supported, in addition to cryptocurrency, smart contracts.
Smart contracts take traditional contracts and make them a part of a distributed ledger. First, let’s consider a traditional, legally binding contract. It’s useful to review the definition of a contract, which per Webster, is:
An agreement or covenant between two or more persons, in which each party binds himself to do or forbear some act, and each acquires a right to what the other promises
The enforcement of a contract is typically done through the law. Let’s say Alice would like to contract with Eve to perform yard work. The terms of the contract are that Alice weeds 100 dandelions. Upon completion of that task, Eve is contracted to pay Alice $20. The contract further stipulates that Alice may weed additional dandelions and be paid $0.10 each. Finally, Eve’s neighbor Bob is named as a mediator to validate the number of dandelions picked if a dispute arises.
Alice begins pulling dandelions from Eve’s yard and eventually finishes, having pulled 150 dandelions. Per the contract Alice is due $25, however Eve decides to pay her only $10. At this point the contract has been broken and Alice may bring in Bob as mediator and possibly pursue legal action against Eve.
Party | Role |
---|---|
Alice | Pick dandelions |
Eve | Pay agreed rate of $0.20 per dandelion up to 100, $0.10 thereafter |
Bob | Arbitrate payment in the event of a dispute |
Table 1 - Contract Example
Smart contracts are protocols that allow a contract to be computerized in a way that they are automatically facilitated, verified, and enforced. Consider the example above as a smart contract. The terms are the same, but instead of being paid $20 for 100 and $0.10 each thereafter, Eve promises to pay 100 ETH and .1 ETH each thereafter, ETH being the cryptocurrency of the Ethereum blockchain.
These conditions are written as part of the smart contract and included in the blockchain, signed by all parties involved, signifying their agreement to the terms. Once both Alice and Eve agree on the number of dandelions picked, the smart contract would automatically execute and Alice would be given her 25 ETH. Bob may still play a role as a third party, he simply needs to be written into the smart contract. Furthermore, smart contracts allow this sort of interaction between anonymous and untrusted parties and works particularly well for transfer of on-chain assets (typically cryptocurrency, specifically Ethereum in this case).
A good definition for smart contracts was given by Richard Brown:
A smart-contract is an event-driven program, with state, which runs on a replicated, shared ledger and which can take custody over assets on that ledger.
Figure 1 below generalizes well how a smart contract might live on a blockchain (which the figure labels a “shared, replicated ledger”).
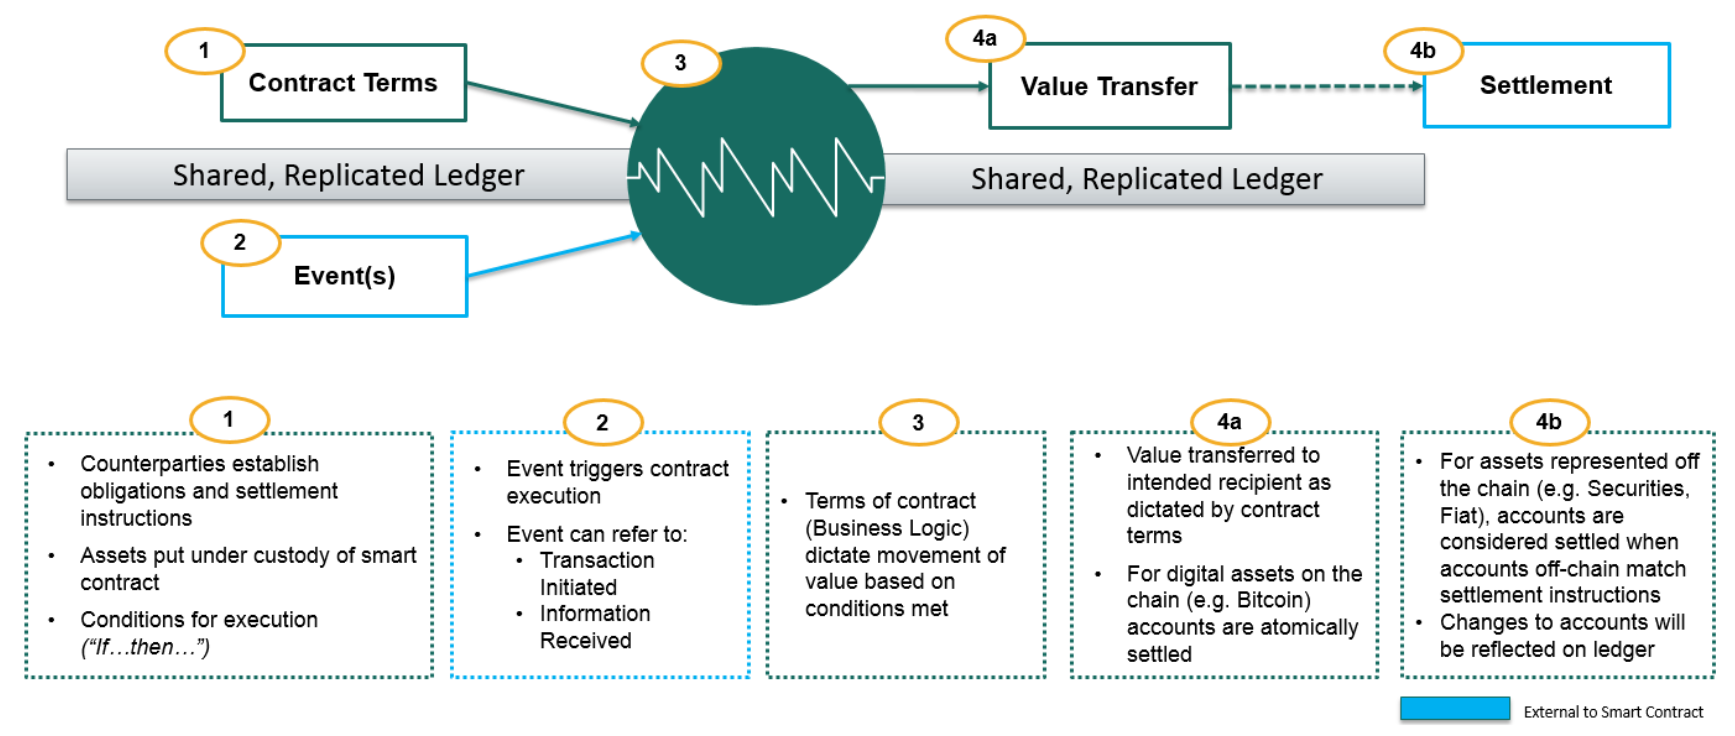
Figure 1 - Smart Contract; Image credit: Jo Lang / R3 CEV
There is incredible potential in smart contracts which we will discuss later. However, some of the proposed use cases for smart contracts have been shown to be infeasible. Smart contracts have limitations, and it’s important to understand what place they might have in future blockchain technology, or your own organization.
The Ethereum Project made an interesting decision to further expand smart contracts - Turing completeness. If something is Turing complete, it can calculate pi, send an email, and play Doom (although the framerate will make it unplayable since very slow, computing 25 transactions per second (as of January 2016))
This is what Ethereum calls the Ethereum World Computer or the Ethereum Virtual Machine. It sounds a bit like Deep Thought from Hitchhiker’s Guide to the Galaxy, but it is hopefully a bit faster at coming up with the answer 42.
Figure 2 - Deep Thought; Image credit: Hitchhiker’s Guide to the Galaxy
It’s important to remember that Smart contracts are computer code. Computer code may have flaws, and arbitrary code will have arbitrary flaws. It’s only a matter of time until smart contracts are executed erroneously using a vulnerability in the smart contract code.
One more thing - smart contracts are computer code, and computer code may contain bugs. Consider what can go wrong with buggy code and an immutable blockchain; anyone embracing smart contracts should be fully aware of the risks.
Proof of Stake (PoS) algorithms are an alternative to proof of work mechanism used to achieve distributed consensus among peers. Instead of competing to generate an acceptable hash using intense computational power, PoS determines the next block winner in a deterministic way based on the stake of the account holder.
There are different implementations that use different methods to choose the next block owner, such as randomization or ‘coin age’ (the time since that coin has been awarded a block). In either case, the probability increases with the amount of stake the account holder has. If you own more coins, the likelihood that you will be awarded a block is increased.
This area of development is very interesting because it answers, in part, a very significant drawback of the proof of work consensus system - the wasted energy and work expended in keeping the blockchain secure. For example, in 2014 the energy consumption to mint a bitcoin was equivalent to 16 gallons of gasoline. The costs have only increased. Ethereum has announced they plan to move to proof of stake for block generation in the future and many new cryptocurrencies are opting to use proof of stake instead.
Bitcoin and Ethereum are considered permissionless systems - in other words, their users are largely anonymous or at least pseudonymous. They do not require permission to become a part of either network. There are no gatekeepers. The transactions may be verified by the public, and transactions may be initialized by the public (as long as they have bitcoins or ether to spend).
Conversely, a permissioned system has some sort of authentication to ensure that only permissioned users participate in the ledger. Permissioned ledgers may still be validated by the public but may only be written to by trusted (permissioned) individuals. Or, they may be completely private - accessing and contributing to the ledger restricted to authenticated nodes only.
Permissionless (Public):
Permissioned (Private):
Permissioned ledgers greatly expand the potential applications of blockchain technology. For example, banks are not interested in a cryptocurrency that relies on anonymous validation (such as Bitcoin or Ethereum), especially when banks don’t benefit from the anonymity that comes at such a high cost - banks send or receive money from other legitimate banks. Instead of using permissionless cryptocurrencies, the bank may fork Bitcoin into an altcoin that only allow transactions signed by known good actors (that they can authenticate).
All the organizations that are uncomfortable with using a distributed ledger subject to an anonymous majority now have the opportunity to exploit the advantages of blockchains without sacrificing control or paying the overhead of proof of work.
Beyond the myriad alternative altcoins that have multiplied in the years since Bitcoin, there are some noteworthy applications of blockchains that are worthy of a quick overview.
A phenomenon that has become more common and newsworthy in recent months is the Initial Coin Offering (ICO). Meant to mimic an Initial Public Offering (IPO), ICOs offer a limited block of cryptocurrency for sale to the public. This is meant to generate an influx of cash into the company and, like an IPO, is a risky venture.
ICOs don’t represent anything new in blockchain technology, but are instead new ways of distributing the cryptocurrency. They are likely here to stay, but may be regulated in the future.
Since much of the blockchain development has been around permissionless (and anonymous) blockchains, the idea of involving off-chain assets (property, goods, services) has not been seriously attempted until fairly recently. One of the problems facing integrating off-chain assets is legal enforceability of blockchain contracts. If a permissioned ledger uses legally accountable validators (known as miners in Bitcoin) and meets other legal criteria, it could pass government regulatory requirements.
A particularly good application for smart contracts is the Insurance industry. Figure 3 shows how an insurance claim that is executed by smart contract could work.
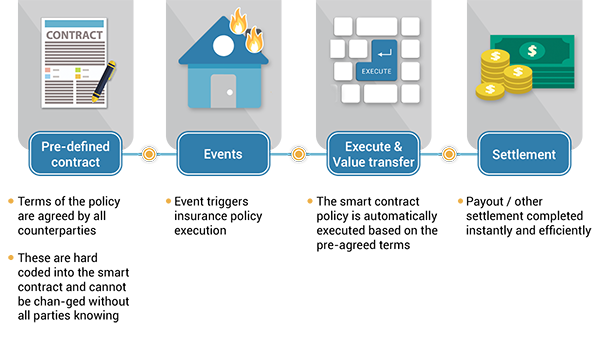
Figure 3 - Smart Contract Example for Insurance; Image Credit: Wikipedia
Extending smart contracts to real estate has potential to bypass an entire cottage industry dedicated to taking a large cut from the homebuying process at the expense of the home buyers and, to a greater extent, the sellers. Buying a home is an expensive and risky process, but if you could automate much of the contracts through a distributed ledger with smart contracts that appropriately (and legally) incorporated off-ledger assets (such as titles), the cost and time required to buy a house could be significantly decreased.
Government bureaucracy costs us billions annually. Incorporating distributed ledgers with trusted verifiers maintained by the government would save the American taxpayer a significant amount of money by ensuring automatic regulatory compliance. Furthermore, the various state governments could each maintain their own authorized permissioned ledgers that interoperate with other ledgers, such as those envisioned by Hyperledger below. Much of government records are public record - maintaining them in the public eye in a verifiable manner would bring our government into the digital age in a manner never conceived.
Private ledgers promise to provide the same benefits for data that isn’t public, but still needs a verifiable chain of custody. The original vision for blockchains was to timestamp edits to a digital document. Private ledgers could provide similar chains of custody for classified documents that would help avoid a Snowden-like scenario in the future.
Consider the following scenario: You are a hardware manufacturer that developes and produces high-end hardware. You are successful, however you notice that counterfeit versions of your hardware is beginning to enter the market. Any attempt you make to change your hardware to detect counterfeits are easily incorporated by the counterfeiters. This story is very common with hardware producers, and they all fight counterfeits with varying levels of success.
What if our manufacturer in the story used a permissioned ledger? Every piece of hardware is included in a (block)chain of custody. The manufacturer signs each piece of hardware as they roll of the assembly line, possibly even using a form of RF-DNA (Radio Frequency DNA) to uniquely identify the emissions of computer hardware.
The wholesaler who purchases the products adds his signature to the chain of custody for each item, indicating that they are now in possession of each piece of hardware. The retailer who purchases the products from the wholesaler does the same thing, and the blockchain shows an uninterrupted chain of custody from the manufacturer to the retailer. When the hardware is purchased, the retailer can record the transaction and the chain of custody can reflect that the item has been purchased.
The consumer, or anyone at any time in this chain, can look up the unique serial number of the hardware and view the unbroken chain of custody back to the manufacturer. Furthermore, if the serial number is derived from the RF-DNA of the hardware, it would be difficult if not impossible to counterfeit.
This chain of custody example can extend to other assets as well, such as digital and high-value assets. Chain of custody is an application of blockchain technology that is most true to the 1991 paper by Haber and Stornetta than any I’ve covered in these articles.
Image credit: The Linux Foundation
Started by the Linux foundation in 2015, Hyperledger is a collection of open source blockchains and tools. It is made up of different fledgling platforms that are sponsored by different organizations, including Intel and IBM.
Their vision includes enabling different parties to securely interact with the same universal source of truth, including:
Their vision is that any industry could benefit from the immutability and public verifiability that blockchain offers.
Image credit: Sovrin Foundation
One of the more ambitions Hyperledger frameworks is Hyperledger Indy sponsored by the Sovrin Foundation. Sovrin aims to utilize blockchain technology to provide each human being a sovereign, digital identity. The foundation aims to provide identities that are “100% owned and controlled by an individual or organization” that can interoperate with other distributed ledgers.
Sovrin relies on a Public Permissioned ledger that allows anyone to manage their own identity, but only trusted distributed nodes can write to the ledger, and only when appropriate consensus is reached. Each identity holder (the public) can manager their individual identities, including who can see what attributes of their identity. It has potential to give voice and identity to the millions of refugees who don’t have either.
Of course the future is unknown and I’m no prophet. These are emergent applications of the technology and I’m sure some visionaries will find applications of distributed ledgers that no one can anticipate. That’s the beautify of this technology - we have some great minds focused on exploiting its potential.
Now, let’s see a little about the Privledge project, a blockchain proof of concept written in Python:
Continue to Part 3: Privledge
]]>A distributed digital currency was one of the most sought-after applications for distributed systems, however a huge problem stood in the way of its development: the double spend problem. As the distributed ledger evolved and researches made progress in applied cryptography this obstacle was ultimately overcome.
In 1991, two employees of Bellcore (AT&T’s telecom R&D company) Stuart Haber and W. Scott Stornetta published an article in the Journal of Cryptology on How to Time-Stamp a Digital Document using a cryptographically secured chain of blocks. Their research was motivated primarily by finding a way to build a ledger of changes made to a digital document. It wasn’t until 15 years later that their research was put to use in solving the double spend problem.
Satoshi Nakamoto* published the seminal Bitcoin paper in 2008. The paper is surprisingly simple; it succinctly describes how a distributed ledger and proof of work (more on that later) could be used to ensure that mutually distrusting peers could engage in currency transactions without fear of double spending.
On January 3, 2009, shortly after Nakamoto published the paper, the Bitcoin genesis block was created.
I recommend the paper to anyone with an intermediate understanding of cryptography. I will still go through blockchain fundamentals as described in the paper, but before we dive into blockchain technicalities, let’s make sure we’re on the same page with some important cryptography basics. If you need more than this review, I recommend watching these short videos on public key cryptography and cryptographic hashing.
*Satoshi Nakamoto is the pseudonym used by the creator of Bitcoin. His identity is still not public.
Cryptographic hashes are secure one-way functions; they will easily convert a message to a fixed-length unique bit-string, but they are non-invertible. The only way to reverse a hash function is by a brute-force search which could take thousands of years, if not more, depending on the hashing algorithm used.
Here is an example of a linux command that takes the two words blockchain
and Blockchain
and hashes them using the SHA256 algorithm. The output is the hexadecimal digest representation of the bitstring. They are vastly different, even though the input words are very similar.
$ echo 'blockchain' | sha256sum
5318d781b12ce55a4a21737bc6c7906db0717d0302e654670d54fe048c82b041
$ echo 'Blockchain' | sha256sum
fe7d0290395212c39e78ea24ba718911af16effa13b48d1f6c9d86e8355e0770
Figure 1 pushes the point further:
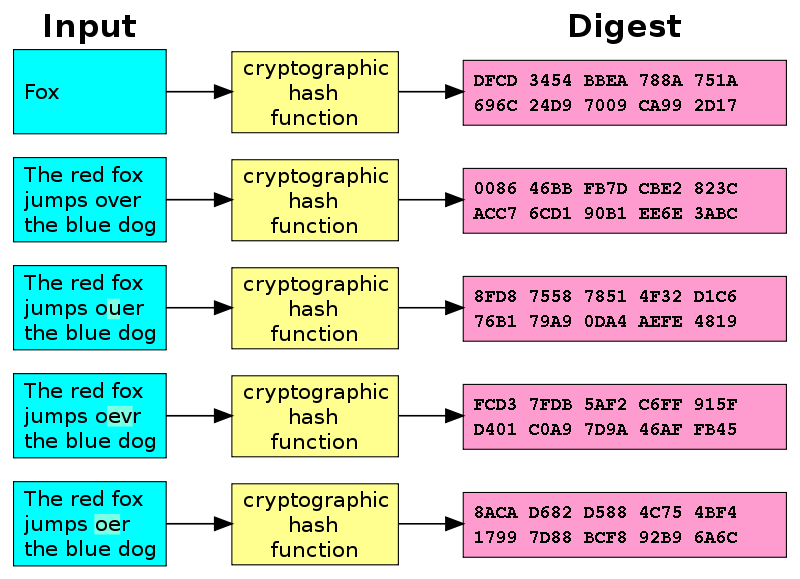
Figure 1 - Hash Diagram (Image credit: Wikipedia)
If you’re not sure why you would even want a one-way function, here are some applications of hashing.
The strength of blockchain security lies in its use of public key cryptography. It is also called asymmetrical cryptography because it is comprised of two keys - a public key and a private key. Both keys may be used to encrypt data, however they may only decrypt data that was encrypted by its partner key. In other words, if you encrypt a message with a public key, only the private key may decrypt that message. In like manner, only the public key may decrypt messages that were encrypted by the private key.
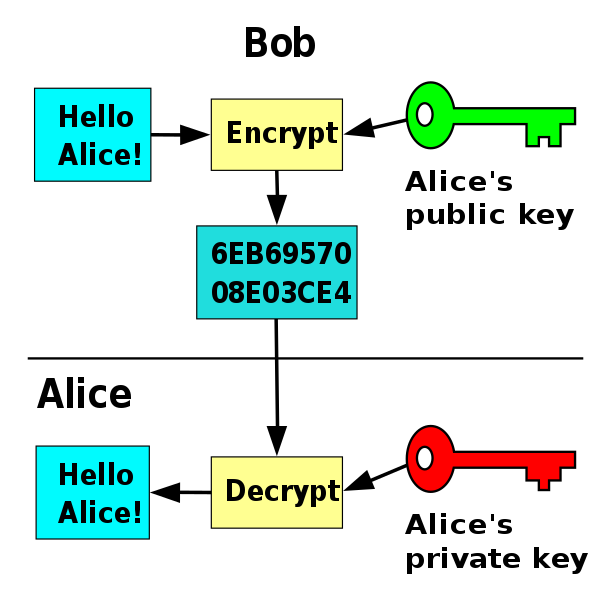
Figure 2 - Public Key Flowchart (Image credit: Wikipedia)
This property of public key cryptography enables some very important security features that we rely on daily, whether we know it or not:
This little detour will hopefully make understanding the Bitcoin blockchain easier.
Detailed in the Bitcoin paper, the blockchain is surprisingly simple.
Like any ledger, Bitcoin is made up of transactions. Eve (Owner 1 in Figure 3) sends 5 BTC (bitcoins) to Bob (Owner 2). Eve simply creates a new transaction with the details (5 BTC), includes Bob’s public key (this is considered his address), and signs the transaction with her private key. Since she is the only one who could be the author of that signature, and since she was the previous owner of that money, the transaction is considered valid. As long as Bob maintains control of his private key, he controls that money, since the private key is all that is needed to move the money to someone else.
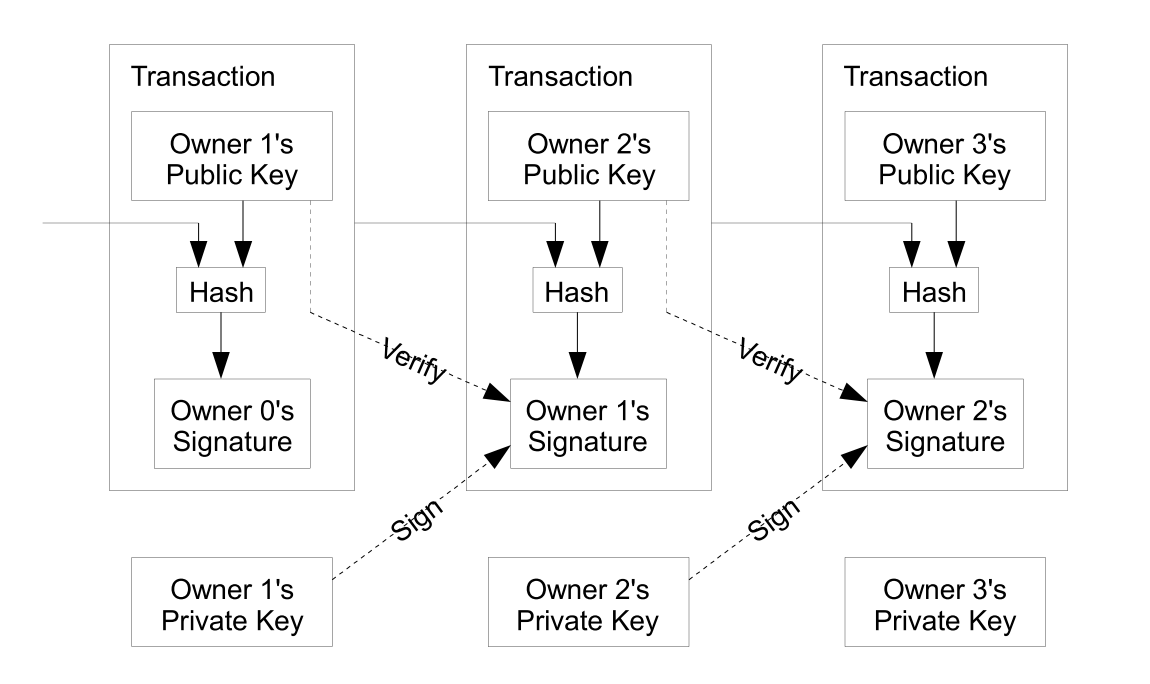
Figure 3 - Bitcoin Transactions (Image credit: Satoshi Nakamoto)
This system allows for a non-repudiable chain of events (a ledger) to be established. Is this enough for digital currency? Not yet! There is no mechanism in place to ensure that Eve doesn’t double spend her money. What if she sends the same 5 BTC to Alice? And then to a dozen other recipients? This is the problem of double-spending
Nakamoto suggested a solution to the double spend problem by a proof-of-work network that serves to maintain the truth and consensus of the state of the ledger by hashing a group of transactions at regular intervals. The transactions are collected into blocks which are then hashed along with the previous block. This creates a chain of blocks that are cryptographically validated and are resistent to forgery - a blockchain (Figure 4).
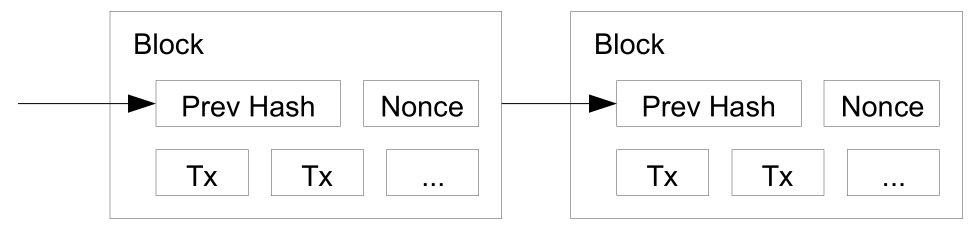
Figure 4 - Blockchain (Credit: Satoshi Nakamoto)
In essence, miners on the proof-of-work network are competing to complete a block. A miner that is successful in mining a block gets a reward of some number of bitcoins plus transaction fees. Completing a block requires the following:
#3 is the core of the proof-of-work concept. The difficulty target is a number wherein the hash of the block must be lower than or equal to for it to be accepted. As the difficulty target gets smaller it becomes more difficult to mine a block - and this number is adjusted to try and keep the block production to one every ten minutes. So, if there is an increase in miners competing for a block, the difficulty target is adjusted to keep the block production rate steady.
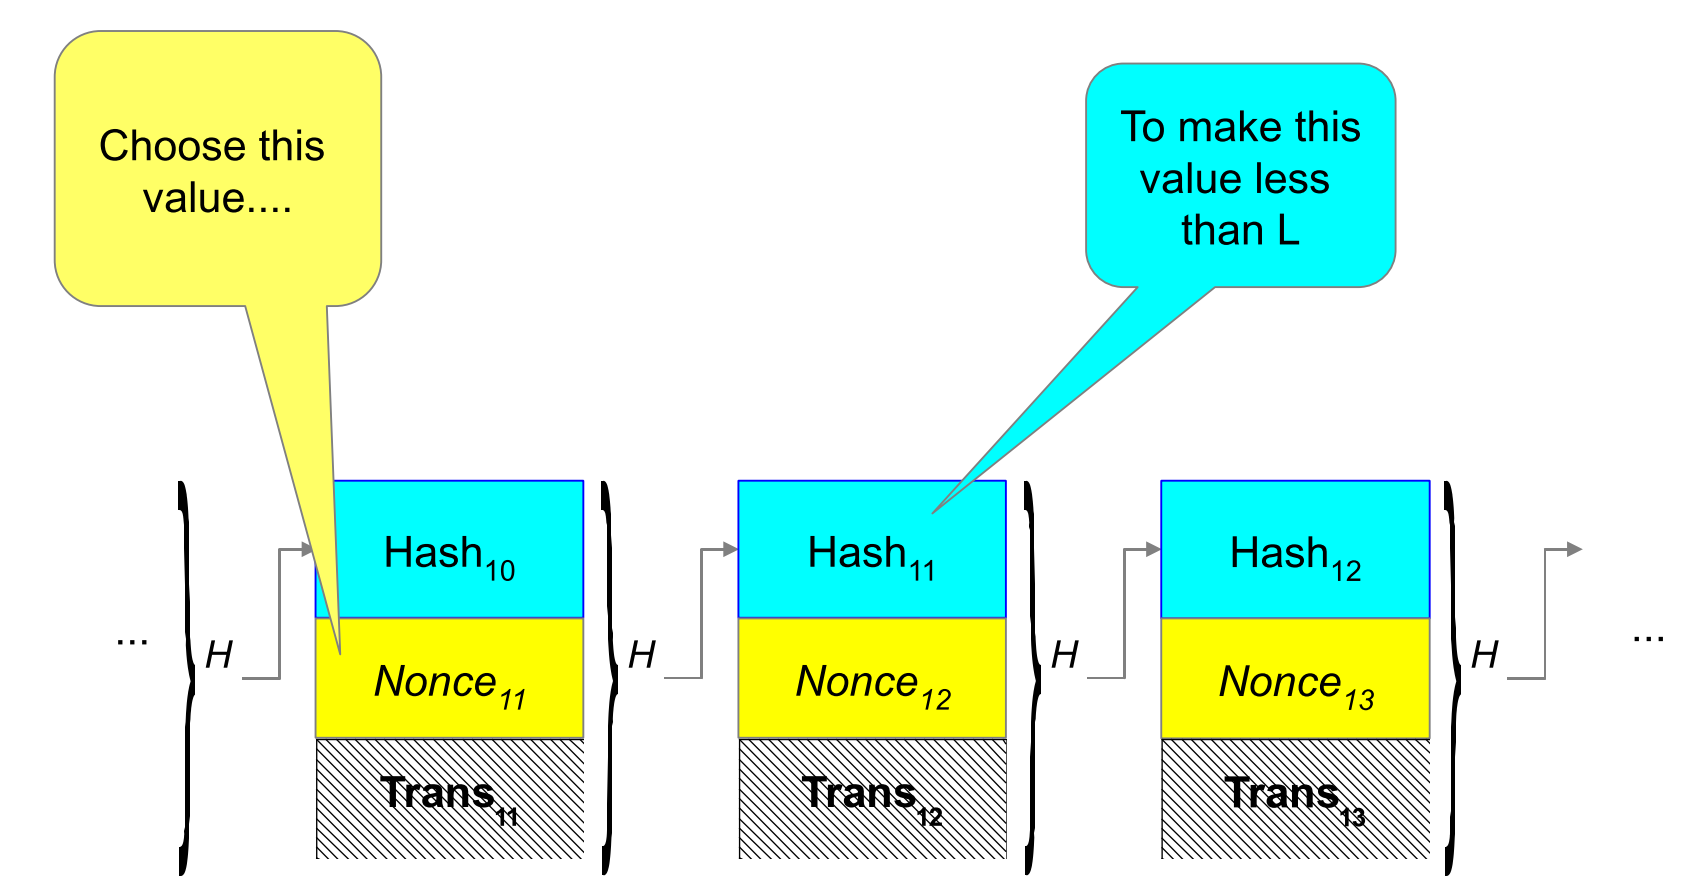
Figure 5 - Proof of Work; Image credit: John Kelsey, NIST
Consensus between miners and users is managed by the simple concept of accepting the longest legitimate chain of blocks. So if a miner computes a block it is immediately accepted by everyone else and all miners start working on a new block. A very important part of this proof-of-work system is that it makes it extremely difficult for Eve to double-spend. For her to double-spend she would have to sign the duplicate transactions at some point in the chain and then recompute the chain of transactions to make her illegitimate chain the longest. This is infeasible because it would require the majority of all mining power to be dedicated toward this goal - and even then it would only allow Eve to double-spend, not conjure bitcoins out of thin air. If she could muster that kind of compute power she would be much better off just using it to mine new bitcoins.
There certainly is more to Bitcoin than just these, especially now since Bitcoin has evolved beyond Nakamoto’s Bitcoin paper. But for now we will use this basic understanding of blockchain to help us understand the state of blockchains today.
Continue to Part 2: Blockchain Present and Beyond
]]>So Hot Right Now
You may have heard of Blockchain technology - if you haven’t, you likely have heard of Bitcoin. You may only know enough to be confused by it or to have your curiosity piqued. In any case, you’re in the right place. Feel free to contact me in the comments below or through my social media accounts if you have any questions or if you spot an error.
Let’s go over a bit of background first - trust me, it will help out later on. Networks fall roughly in three categories:
Figure 1 - Network Types (Image credit: Wikipedia)
It’s important to understand that we’re not only talking about computer networks, although they make up nearly the entirety of what I talk about in this article. This taxonomy of networks applies to all networks, such as social, commercial, and political. I’ll try to include non-computer network examples below.
Figure 1-A: Although not a good candidate for blockchain protocols, let’s understand what a centralized network is to provide some context for the other two network types. Centralized networks have two primary characteristics:
Figure 1-B: It is possible for blockchain protocols to support decentralized networks, at least in part (as validators), however this is not typical. Decentralized networks have two primary characteristics:
Figure 1-C: Blockchains are considered a distributed ledger or distributed database. A blockchain protocol (wholly or in part) comprises a distributed network. Distributed networks have two primary characteristics:
*Anarchy consists of individuals with complete individual sovereignty - governments unto themselves. In this way anarchy may be considered a completely distributed form of government.
This important and difficult question didn’t have a good answer for many years. Confidence and trust are mutually necessary for most systems, however they are very difficult to accomplish in a distributed network.
Consider an Analogy:
I’m borrowing this analogy from National Institute of Standards and Technology (NIST)’s John Kelsey’s 2016 Introduction to Blockchains
Correspondence Chess or Chess by Mail was a very popular pre-Internet method of multiplayer ‘online’ gaming. It’s played still, though its popularity has waned.
Alice and Eve want to play Correspondence Chess. Alice makes the first move:
1 e4
1 e5
2 Nf3
Correspondence Chess is an example of a distributed network, albeit with only two nodes. Each party has a copy of the board at home, and each has independent and total control of their own board. For the game to be playable, each has to agree on the state of the game.
If Eve attempts to cheat, will Alice know? How?
The game is composed of the following parts:
The state of the game at time t
is represented by every message, in order, up until time t
. In other words, If we agree on the history of moves, we agree on the present state of the game. That history is represented by what is called a distributed ledger.
I have been primarily using the word blockchain, however now that we understand what a distributed ledger represents, I will use that term as well. For the purposes of this article they are synonymous.
Just as the Correspondence Chess game allows mutually-distrusting players to agree on the state of the game, a distributed ledger allows mutually-distrusting users to agree on the state of the distributed system. That’s how a distributed ledger (such as blockchain) inspires confidence among untrusting and anonymous nodes.
Continue on to the meat of the series, Part 1: Blockchain Origin Story
]]>Usage: zfs_smart.sh -p <POOL NAME> (-s|-l)
I picked up the Kuman Project Starter kit as well as an infrared PIR Motion Sensor, SD Card Shield, and amplifier from Amazon. Along with some old speakers and 5v power bank I already had, these were all the components I needed to get my pumpkin to scream.
My daughter has a pet slug (just a little toy), so I decided to turn my pumpkin into a horrible monster slug. My goal, ultimately, was to have an eerie ‘flickering’ candle (LED), Green LED eyes on the end of stalks, and to have it respond to motion by playing one of several scary sounds. It ended up scaring her quite a bit, so I think that means it was a success!
Plugging it all together wasn’t difficult, though it was a bit cluttered. Perhaps a case is in order for next time, as long as it can house all the components I need.
Unfortunately I don’t have a photo of it assembled, besides the video below, however here is the code that put it all together:
]]>