
Acer Aspire One Bluetooth Mod (Soldering Info) & Ram Upgrade
I have been in the market for a netbook ever since Asus announced their ≈$200 laptop EEEPC way back, which started a major trend. And now that Asus has released a dozen or so models of the EEEPC and other manufacturers have released their own copycats, I gave the netbook market another look.
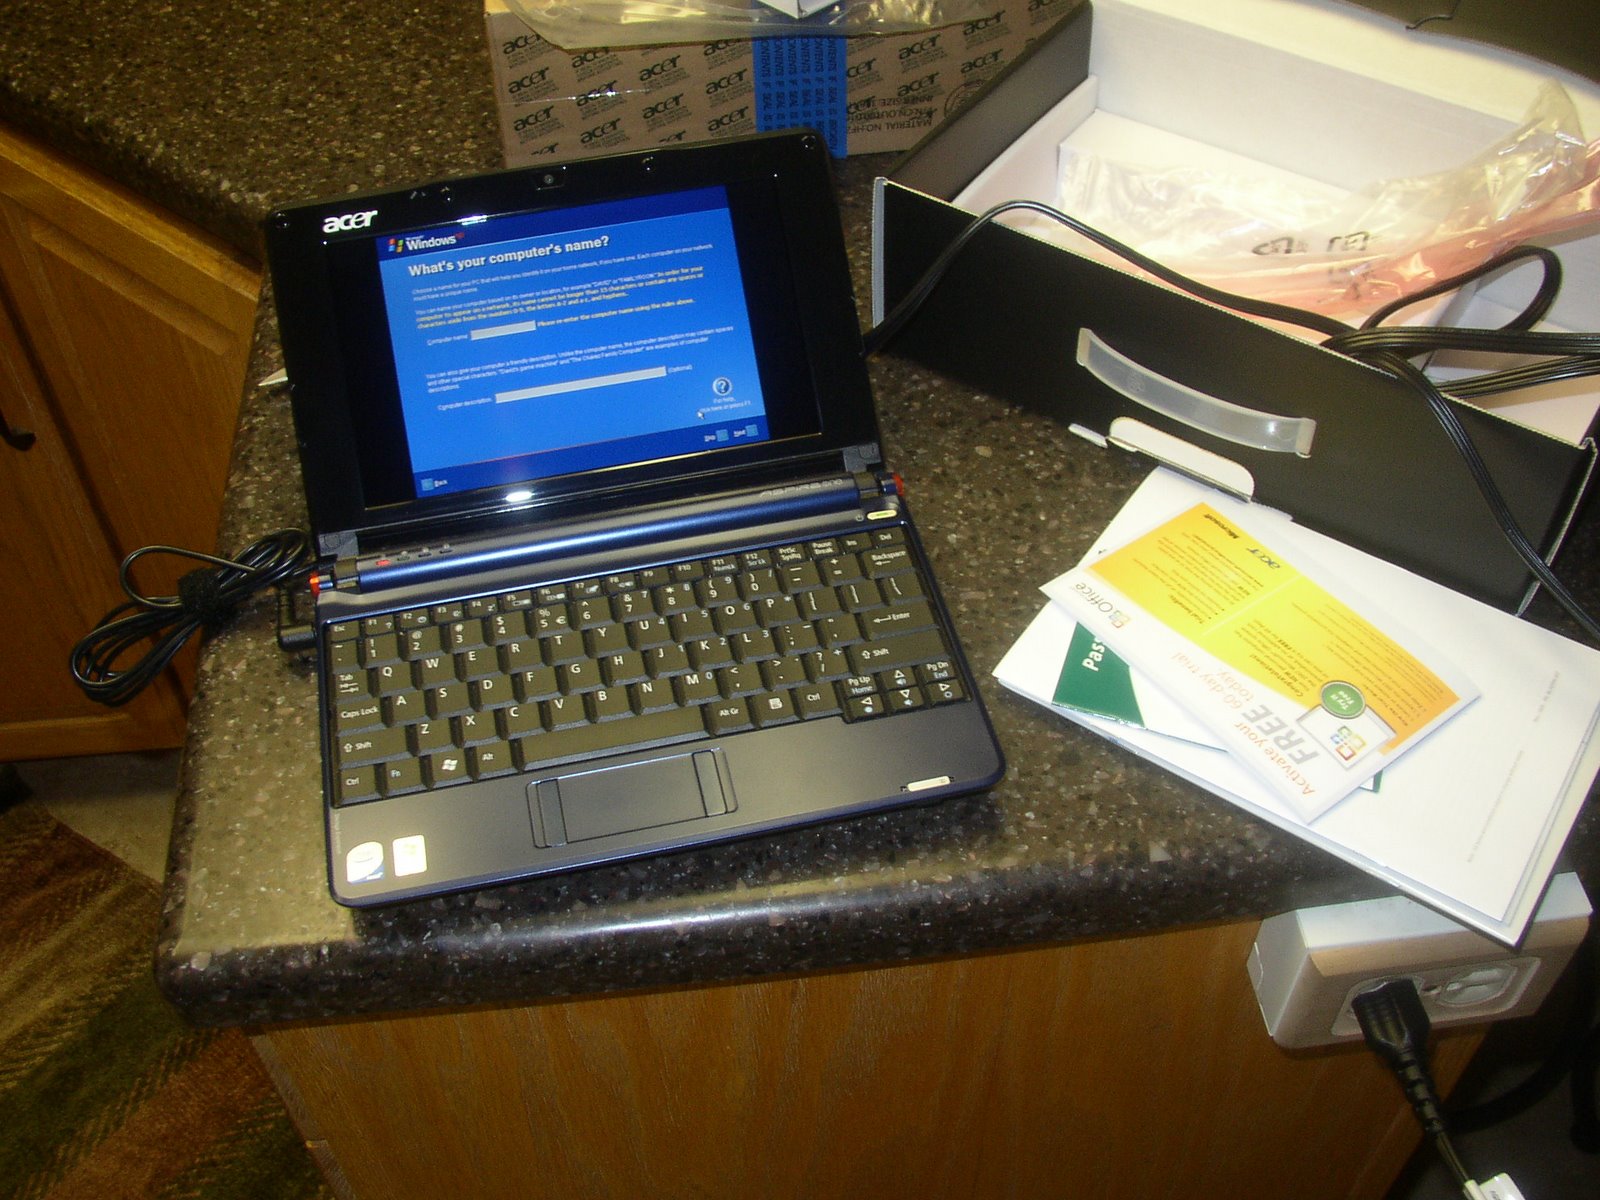
A recent article on Engadget caught my eye, revealing an announced price drop on the Aspire One to $350 for the Windows XP version with the 120GB HDD and 1GB RAM. I was interested, and when I saw a Best Buy coupon for $100 off any laptop and an advertisement showing the Aspire One in stock for the following week, I decided to jump.
 After the initial setup I cleaned off as much of the crap that is pre installed as I could and changed a few settings. I use Vista on my desktop and I was interested in the possibility of throwing Vista on this little guy. After reading a few posts at aspireoneuser.com about other people installing Vista on their Aspire One and the subsequent battery performance gains (Vista is much better at power management from what I’ve read), I decided to jump. I mucked around for a while trying to get a bootable usb stick with a vista install image on it but eventually had to give up and use a USB CD drive I found here at work.
Install was fast, and the performance with a full Vista Ultimate install was impressive. Aero worked perfectly after installing the latest Intel display driver. I used the SDHC reader slot found on the left side, normally used for SSD augmentation, as a permanent readyboost drive with a 4GB SDHC card.
After install I followed this guide to tweaking Vista written by TweakHound. I partitioned the HDD into two drives and made some adjustments with the document folders and with virtual memory. All the details are found in the guide which is quite extensive and well written.
At this point I installed all my apps, including Office 2007 ultimate, RocketDock, Blackboard Backpack, Firefox, etc and had a GREAT little netbook.
Having read this article on Engadget, I had on my list of to-dos a bluetooth install and memory upgrade as demonstrated by tnkgrl on her blog.
I watched her videos and I felt good about opening up the Aspire One. I took some decent notes, as the station I was going to use for my work didn’t have a computer available. I also noted some of her pictures and printed them out for reference. I will be marking them up and using them below, however the originals are all credited to tnkgrl. To see them more closely click on them. To download very high resolution versions of the photos visit tnkgrls flicker album for this project. Most of the images are VERY HIGH RESOLUTION, though some are slightly blurred.
Take Apart
I simply followed this video by tnkgrl posted on her blog for the take apart and for reassembly.
I did accidentally damage the front clip which is on the same piece as the trackpad so be very gentle when you’re removing the case (which is underneath the keyboard). The clip still held when I reassembled, but I don’t think it will take much more damage. Also, be sure to keep the screws in separate piles and remember where the short screws come from and where the long screws come from. I had to guess, which I hate doing for projects like this.
Also, when removing the clip holding the keyboard and trackpad ribbon cables, the clip came completely off the mount. DON’T LOSE these. I don’t know whether they were supposed to come off or not, however I didn’t apply excessive pressure. It looks like they’re just cheap or built like that out of necessity. In any case, you can put them back on, just make sure they are put back on right-side-up.
To access the RAM you have to remove the entire motherboard - and in my version with the 2.5” HDD I had to also remove the daughter board. It’s straight-forward and I had no trouble with this part. Watch the video linked above if you want to see what this looks like.
RAM
Installing ram was incredibly simple after the trials endured in unpacking the motherboard. If only I knew what was to await me in the bluetooth department… Anyway, I popped out the 512MB 5300 SODIMM piece and slapped in a Netlist 1GB 5300 DDR2 piece, which worked beautifully by the way. When I rebooted and windows took a long time loading I nearly fainted, but I think that was Windows adjusting to the new hardware. Windows doesn’t like hardware changes.
Bluetooth
This was the hardest part, and this is why I wrote this post. tnkgrl had excellent videos on how to unpack the thing, but not much on how to solder the thing together, which is where I spent the majority of the 3 1/2 hours performing this mod. I’m not a skilled solder-ite by any means, but I do have experience. Luckily I was in my University’s EE lab with some great equipment and a helpful lab tech to help me out.
Here are some tips:
- Find the smallest, pointiest iron tip you can find. Having a bulky soldering-iron tip can make it hard to solder those tiny wires on the tiny contacts.
- Use fine wire - tnkgrl recomments 30ga, I used some 22ga and 26ga (it was scrap wire) and had trouble with the big bulky wire (22ga and 26ga is big and bulky?! it is when the application is so @#$# small). Use 30ga. Also, when you strip it, make sure to leave only a tiny amount of wire exposed, because you don’t want the exposed wire shorting anything out.
- When soldering on the mini-pci solder dots, tin the tip of the wire first, then simply place the tinned wire tip on the solder dot. Put the tip of the solder iron (which should not be too hot) at the joint or only as long as it takes to melt the solder that is on the wire. If you need to, lightly poke the joint until there is a bond. The problem here is that the terminals are SO CLOSE TOGETHER that it is easy to et solder overflow onto the next terminal, which leads me into my next tip.
- Use an ohm-meter to measure the resistance between adjoining terminals. If you have very low resistance that means there is a short and you need to clean up the terminal using a braid or something. If you ave high resistance that means there is no connection. I had access to a great ohm-meter that had an alarm for low resistance, so I didn’t have to move my head up from the terminals of the meter.
- This is very small stuff, and while I have great near vision, it was too much for me. Have access to a bright lamp and to a magnifier. Preferably one of the magnifiers you can place in your eye. I had one hat I had to get really close for proper focus and I burned my nose on the soldering iron so BE CAREFUL! 😀
- Because each wire going to the mini-pci terminals had some exposed wire that could potentially short if moved, I used hot-glue to insulate them from each other. It also helped keep them in place. You may also se a silicone glue for the same effect.
Enough of the tips for now, here’s an overview of what I did.
 Original photo by tnkgrl
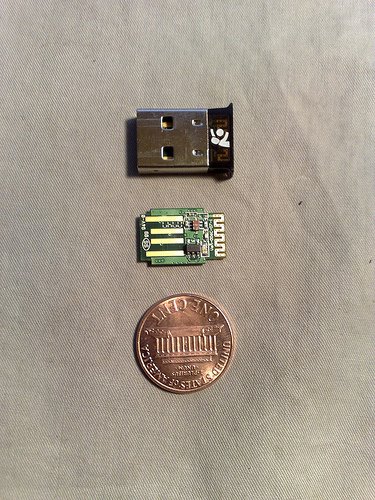
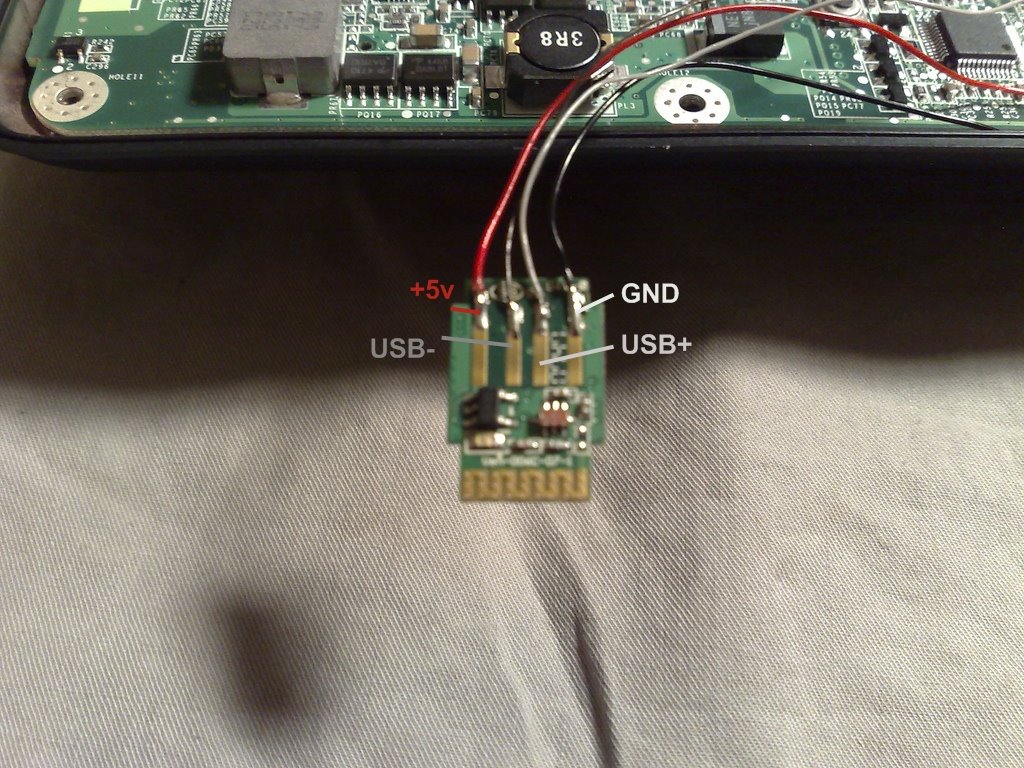
I purchased a Kensington Bluetooth USB Micro Adapter for $30 - $10 mail in rebate. I took off the case and soldered 4 wires on the usb terminal connectors, just like in the image below.
 Original photo by tnkgrl
It is important to note that when soldering stuff like this, it is important to NOT heat up the contact as high as you would in other soldering applications. High temperatures can definitely damage sensitive components. Even though you don’t get the same bond strength it is strong enough for our application. So, follow tip number 3 and you’ll get adequate solders and they will be much cleaner.
After I made sure the connection was good with a multi-meter, I put some shrink tube around the adapter (except the antennae) and made it look nice and professional.
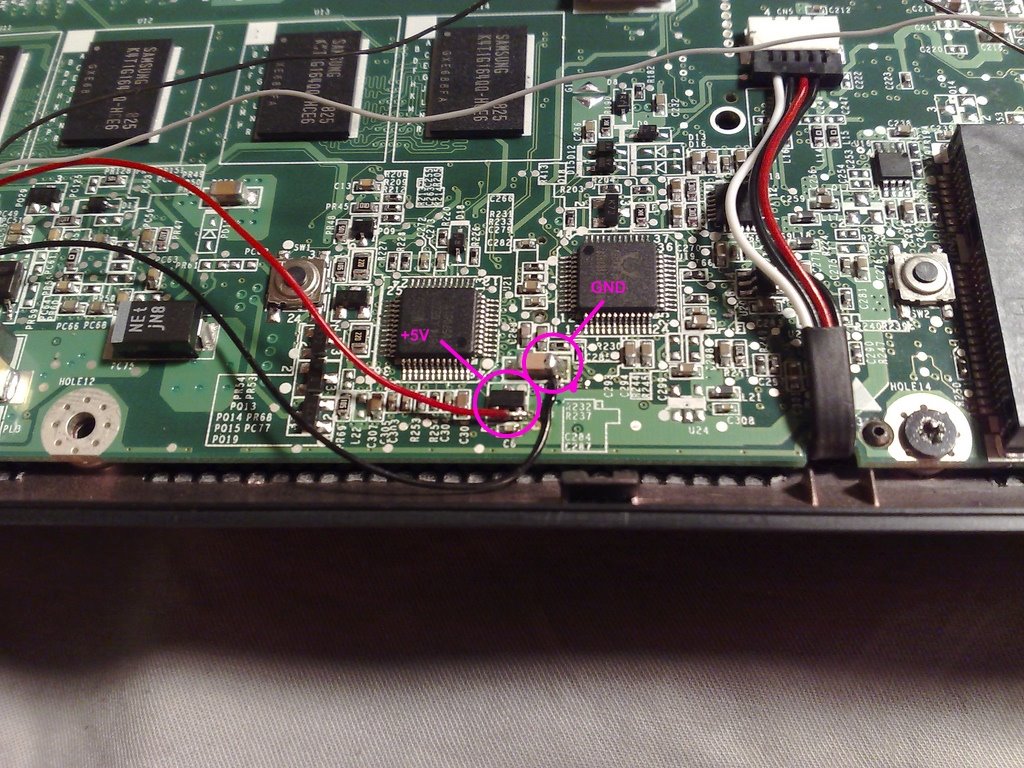
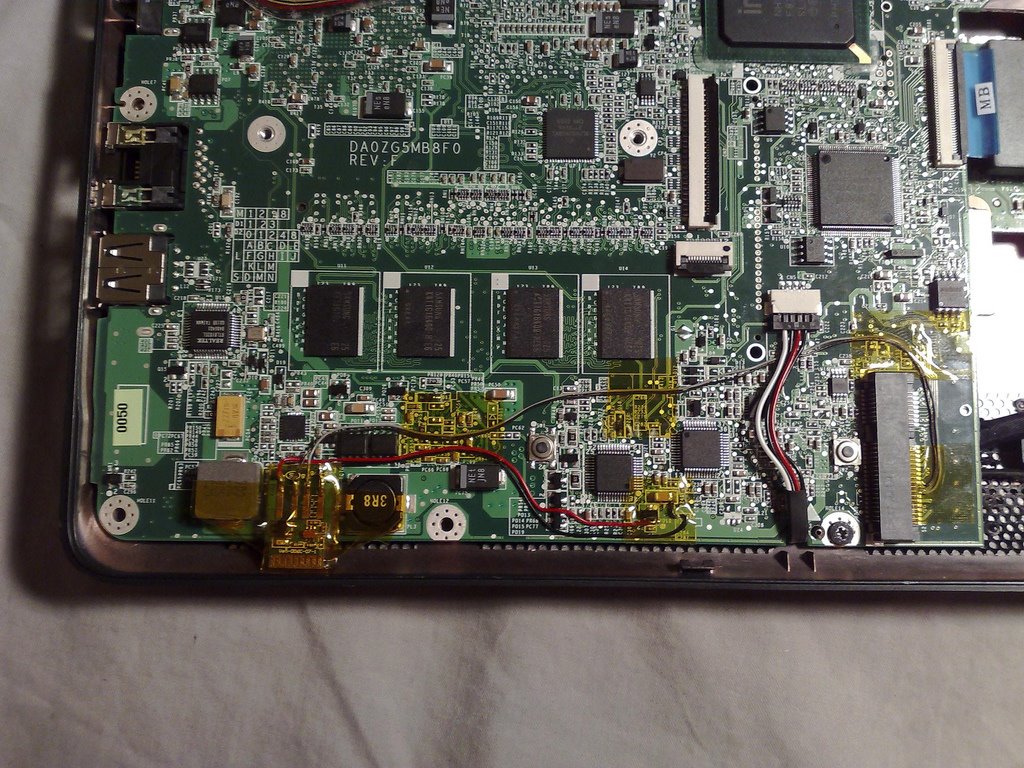
Next, I soldered the +5V and the ground. In the picture below it is not perfectly clear where you solder the wires. The GND wire is soldered onto the right end of the beige colored chip. It’s big, and there’s not much else around it so it is an easy solder. The +5 is a little tougher though. Solder the +5 wire to the bottom right terminal of the black chip in the circle. It is difficult to stay away from the little tan chip at the bottom of the pink circle so be sure to use an ohm-meter if you’re not sure about whether they’re isolated.
 Original photo by tnkgrl
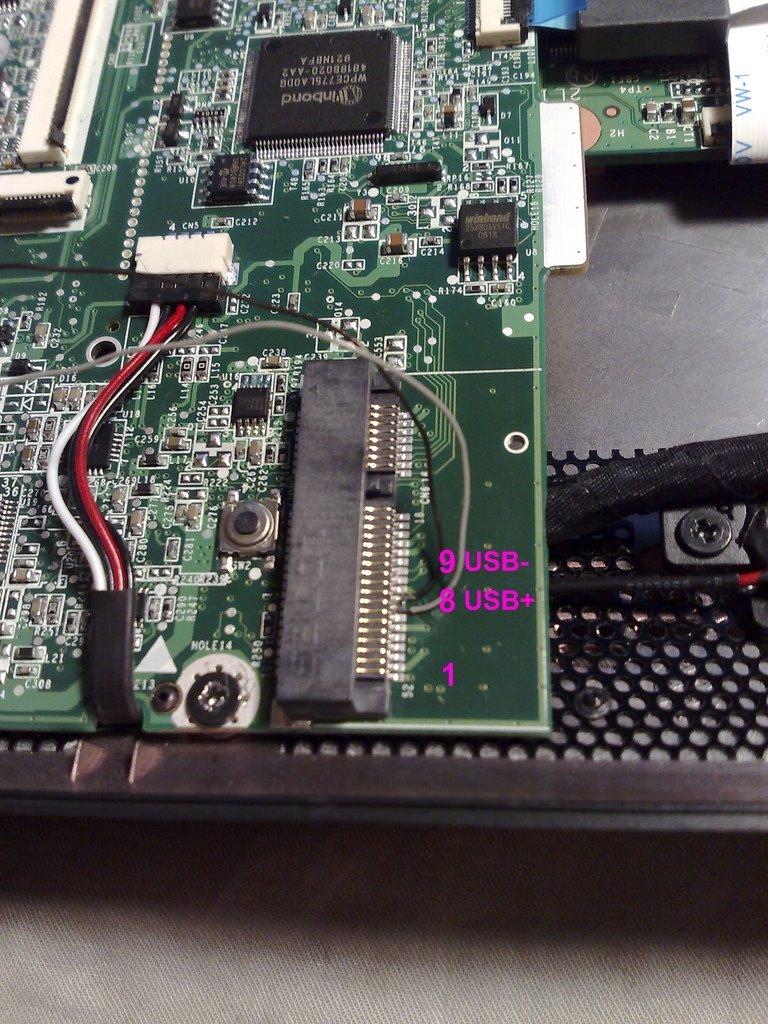
Now for the mother of solders. Like I said, I’m not terribly experienced and this was really tough for me. In the picture below, you can see that we solder onto part of the mini-pci slot. Note, the USB- goes 9 terminals up from the bottom and USB+ is 8 from the bottom. It is very difficult to solder this, so follow my tip number 3 and if you suspect there is a short, TEST IT. You don’t want to have to open this up later to fix it, or worse yet, fry your little lappy.
 Original photo by tnkgrl
Just remember, have a LOT OF LIGHT, a strong magnification source, fine solder, fine soldering iron tip, steady hands, and patience. I didn’t have enough light, strong enough magnification, a fine iron tip, steady enough hands, nor enough patience, so it took longer than it should have. In the end it looked very similar to this:
 Original photo by tnkgrl
Reassembly
Putting it together wasn’t that hard after having watched tngrl’s reassembly vid. I taped down the wire to the board using small strips of standard electrical tape (not ideal but all I had access to at the time), and placed the bluetooth adapter in the same spot as tnkgrl.
I put all the screws back in place and had everything but the keyboard back on. I would recommend plugging the keyboard in and just try to boot up without reassembling everything (of course, make sure all the cables are in place first) to make sure it boots up and that you can see the new ram and even boot into windows to see if the bluetooth dongle is found. If all is well, proceed with reassembly.
So, after 3 1/2 hours and that many heart attacks my first “hardcore” mod is done! I am looking forward to modding this with a gps adapter and 3G when T-Mobile gets 3G in my market. If you have any questions or corrections or even pointers just leave a comment. Credit to tnkgrl for her awesome blog and for fearlessly leading the way to voiding warranties.
Edit 12 September 2008: I started to notice strange behavior of the keyboard and trackpad (the $ symbol wouldn’t work, or the enter key wouldn’t work). Turns out that I managed to “break” the clips the ribbon cables for the keyboard and trackpad hook into. I was expecting them to be the kind of connectors that slide out, and I pushed so hard on them that the black connector piece came off.
After the funny behavior I mentioned, I took it apart and found that the black connector pieces flip up to allow the ribbon cable to be removed or reattached. I was able to reconnect the black pieces to the connector correcly, allowing for a solid connection.
Because of this, I am quite good at removing the keyboard. My tip is to pop all the clips that will stay popped in first (sometimes the clips will stay popped in, locked, others won’t so they have to be pressed in constantly) and then push in any others (there are only 3 so hopefully you have at least one that stays in because you have only 2 hands). If you push it in with a credit card as tnkgrl suggests, you can get the credit card behind the metal keyboard base, and if that’s the case, you can pry it up and pop it out. What happened to me was that usually it would pop up a bit, but not enough to get the credit card behind it, and if I would try to pry the credit card behind the metal base, it would just push the keyboard back ito place. So, I would pry the keyboard up slightly, very gently, under one of the keys (be very careful when doing this) and I used another card (a nice and thin Best Buy Reward Card) to get under the metal base for a more secure hold. Hope this information helps someone.
Comments
Julie
You are such an amazing nerd! I was fascinated just reading this! I'm glad that our little friend is still running (and better than ever I presume). You are so talented!
tnkgrl
Awseome! Like the annotations... Can you credit my pictures? Thanks :)
bradford
Sure thing, I forgot to credit each one individually. I added credit lines in the html - would you you prefer a credit on the image itself?
Pandemonium
My Aspire One will be delivered to me by UPS tomorrow, and I found your blog as I was googling around for info on mods and upgrades to it. Great job on consolidating so many of the links and things of mods into one place! Really well done and readable.It's also good to know there are other LDS geeks, bloggers, and Aspire One users. :-)I was wondering if you could write a bit more on the performance of Vista on the Aspire One in comparison to XP. How big is the performance hit? Do you find it hitting the page file a lot with the 1.5GB of ram? Did you get the battery gains you expected? Anything else to note?If those things are covered in the topics on AspireOneUser.com, then I'd love to just see the links to the threads.Thank you!
bradford
Pandemonium, sorry for the late reply, just got my blog back online.The performance is surprisingly good - I used the following guide on tweaking vista to make it run smoothly (I do this for ALL my vista installs, but I'm selective on which tweaks to perform):http://tweakhound.com/vista... got about a 10-20% gain in battery life - not REALLY huge in terms of minutes, but it's a great bonus. I expect Windows 7 will have even better power management.The 1.5GB ram is enough for what I use it for. I don't run Visual Studio on it, or really any games, but it flys for everything I use it for. Not seeing it get past 700MB for RAM from what I've seen, though I have the HDD partitioned into two partitions with about 2GB pagefile on each partition. I also use ready-boost with a 2GB SD card in the SD slot on the left side. Hope your modding went well!
Adam Martin
Hey. I am definitely going to do this. I found a micro bluetooth dongle from DealExtreme.com for $2.70. I am going to attempt to mod this design even further... I'll keep everyone posted on my results when I'm completed... I'll try and provide a walkthrough as well :)
http://www.dealextreme.com/...
bradford
Adam,
Good luck with your mod! Great deal on that dongle by the way.